In this two-part series, we will look at how Apache® Ignite™ and Apache® Spark™ can be used together.
Let's briefly recap what we covered in the first article.
Ignite is a memory-centric distributed database, caching, and processing platform. It is designed for transactional, analytical, and streaming workloads, delivering in-memory performance at scale.
Spark is a streaming and compute engine that typically ingests data from HDFS or other storage. Historically, it has been inclined towards OLAP and focussed on Map-Reduce payloads.
The two technologies are, therefore, complementary.
Using Ignite and Spark together
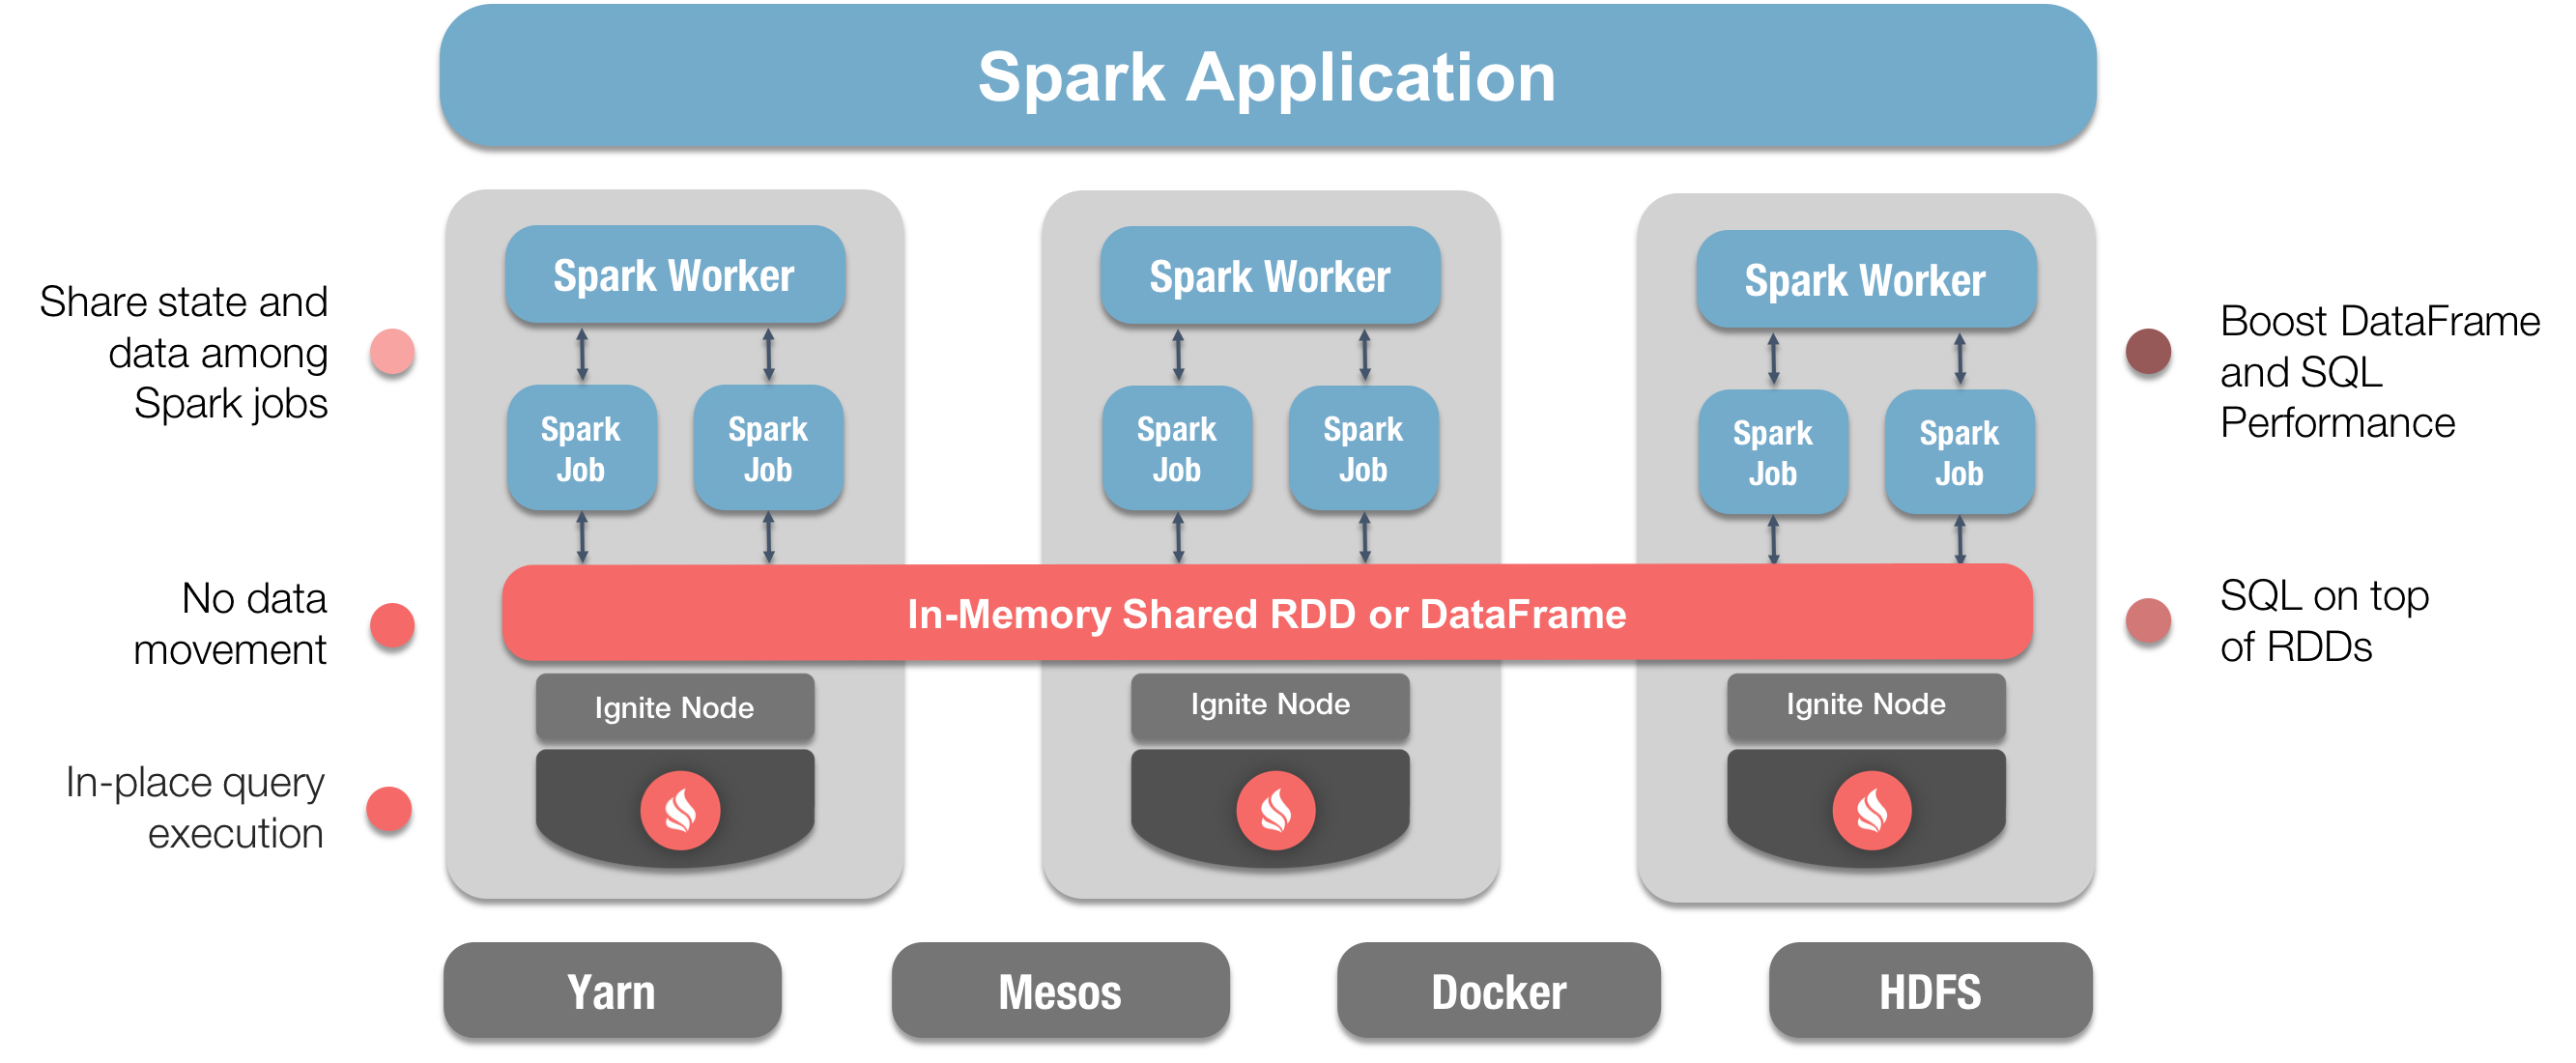
Combining these two technologies provides Spark users with a number of significant benefits:
- True in-memory performance at scale can be achieved by avoiding data movement from a data source to Spark workers and applications.
- RDD, DataFrame and SQL performance can be boosted.
- State and data can be more easily shared amongst Spark jobs.
Figure 1 shows how we can combine these two technologies and highlights some of the key benefits.

Figure 1. Ignite and Spark Integration.
In the first article, we focused on Ignite RDDs. In this second article, we will focus on Ignite DataFrames.
Ignite DataFrames
The Apache Spark DataFrame API introduced the notion of a schema to describe data. Spark manages the schema and organizes the data into a tabular format.
A DataFrame is a distributed collection of data organized into named columns. Conceptually, a DataFrame is equivalent to a table in a relational database and allows Spark to use the Catalyst query optimizer to produce efficient query execution plans. In contrast, RDDs are just collections of elements partitioned across the nodes of a cluster.
Ignite expands DataFrames, simplifying development and improving data access times whenever Ignite is used as memory-centric storage for Spark. The benefits include:
- The ability to share data and state across Spark jobs by writing and reading DataFrames to and from Ignite.
- Faster SparkSQL queries by optimizing the Spark query execution plans with the Ignite SQL engine that includes advanced indexing and avoids data movement across the network from Ignite to Spark.
Ignite DataFrames example
Let’s now write some code and build some simple applications to see how we can use Ignite DataFrames and gain their benefits. You can download the code from GitHub if you would like to follow along.
We will write two small Java applications. We will run our applications from within an IDE. We will also run some SQL code from one of our Java applications.
One Java application will read some data from a JSON file and create a DataFrame that is stored in Ignite. The JSON file is provided with the Apache Ignite distribution. The second Java application will read the DataFrame from Ignite and perform some filtering using SQL.
Here is the code for our writer application:
public class DFWriter {

    private static final String CONFIG = "config/example-ignite.xml";

    public static void main(String args[]) {
        Ignite ignite = Ignition.start(CONFIG);

        SparkSession spark = SparkSession
                .builder()
                .appName("DFWriter")
                .master("local")
                .config("spark.executor.instances", "2")
                .getOrCreate();

        Logger.getRootLogger().setLevel(Level.OFF);
        Logger.getLogger("org.apache.ignite").setLevel(Level.OFF);

        Dataset<Row> peopleDF = spark.read().json(
                resolveIgnitePath("resources/people.json").getAbsolutePath());

        System.out.println("JSON file contents:");

        peopleDF.show();

        System.out.println("Writing DataFrame to Ignite.");

        peopleDF.write()
                .format(IgniteDataFrameSettings.FORMAT_IGNITE())
                .option(IgniteDataFrameSettings.OPTION_CONFIG_FILE(), CONFIG)
                .option(IgniteDataFrameSettings.OPTION_TABLE(), "people")
                .option(IgniteDataFrameSettings.OPTION_CREATE_TABLE_PRIMARY_KEY_FIELDS(), "id")
                .option(IgniteDataFrameSettings.OPTION_CREATE_TABLE_PARAMETERS(), "template=replicated")
                .save();

        System.out.println("Done!");

        Ignition.stop(false);
    }
}
In our DFWriter, we first create the SparkSession that includes the application name. Next, we read a JSON file using spark.read().json() and output the contents. We then write the data to Ignite storage. Here is our code for the DFReader application:
public class DFReader {

    private static final String CONFIG = "config/example-ignite.xml";

    public static void main(String args[]) {
        Ignite ignite = Ignition.start(CONFIG);

        SparkSession spark = SparkSession
                .builder()
                .appName("DFReader")
                .master("local")
                .config("spark.executor.instances", "2")
                .getOrCreate();

        Logger.getRootLogger().setLevel(Level.OFF);
        Logger.getLogger("org.apache.ignite").setLevel(Level.OFF);

        System.out.println("Reading data from Ignite table.");

        Dataset<Row> peopleDF = spark.read()
                .format(IgniteDataFrameSettings.FORMAT_IGNITE())
                .option(IgniteDataFrameSettings.OPTION_CONFIG_FILE(), CONFIG)
                .option(IgniteDataFrameSettings.OPTION_TABLE(), "people")
                .load();

        peopleDF.createOrReplaceTempView("people");

        Dataset<Row> sqlDF = spark.sql("SELECT * FROM people WHERE id > 0 AND id < 6");
        sqlDF.show();

        System.out.println("Done!");

        Ignition.stop(false);
    }
}
In our DFReader, the initialization and setup are identical to the DFWriter. Our application will perform some filtering and we are interested in finding all people with an id > 0 and < 6. The result is then printed out.
From our IDE, we will also launch an Ignite node using the following code:
public class ExampleNodeStartup {
    public static void main(String[] args) throws IgniteException {
        Ignition.start("config/example-ignite.xml");
    }
}
Finally, we are ready to test our code.
Running the applications
First, we will launch an Ignite node in our IDE. Next, we will run our DFWriter application. This produces the following output:
JSON file contents:
+-------------------+---+------------------+
|         department| id|              name|
+-------------------+---+------------------+
|Executive Committee|  1|       Ivan Ivanov|
|Executive Committee|  2|       Petr Petrov|
|         Production|  3|          John Doe|
|         Production|  4|         Ann Smith|
|         Accounting|  5|    Sergey Smirnov|
|         Accounting|  6|Alexandra Sergeeva|
|                 IT|  7|         Adam West|
|        Head Office|  8|    Beverley Chase|
|        Head Office|  9|      Igor Rozhkov|
|                 IT| 10|Anastasia Borisova|
+-------------------+---+------------------+

Writing DataFrame to Ignite.
Done!
A comparison of the above results with the contents of the JSON file show that the two are identical. This is what we would expect.
Next, we will run our DFReader. This produces the following output:
Reading data from Ignite table.
+-------------------+--------------+---+
|         DEPARTMENT|          NAME| ID|
+-------------------+--------------+---+
|Executive Committee|   Ivan Ivanov|  1|
|Executive Committee|   Petr Petrov|  2|
|         Production|      John Doe|  3|
|         Production|     Ann Smith|  4|
|         Accounting|Sergey Smirnov|  5|
+-------------------+--------------+---+

Done!
This is what we would expect.
Summary
In this article we have seen how easily we can use Ignite DataFrames. We have been able to write values to and read values from an Ignite DataFrame.
Further code examples are also available as part of the Apache Ignite distribution.
This concludes this series on using Apache Ignite and Apache Spark.
